Mastering Design Patterns in Java
As developers, our goal is not just to make things work, but also to make sure our code is maintainable, scalable, adaptable and reusable.
Enter design patterns — the time-tested blueprints that empower us to tackle recurring design problems with elegance and efficiency.
At its heart, a design pattern is like a ready-made solution for common problems we face when designing software. These solutions are like shortcuts, saving us time and effort by using proven strategies that experts have refined over many years.
In this article, we’ll delve into some of the most important design patterns that every developer should be familiar with. We’ll explore their principles, why they’re useful, and how you can use them in real projects. Whether you’re struggling with creating objects, organizing relationships between classes, or managing how objects behave, there’s a design pattern that can help.
Let’s begin.
1. Singleton pattern
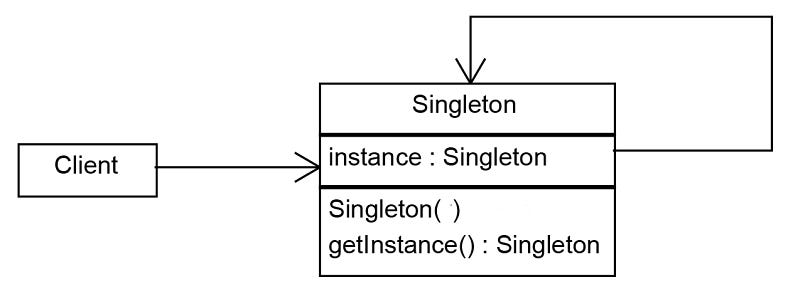
The Singleton pattern is a creational design pattern that ensures a class has only one instance and provides a global point of access to that instance. In simpler terms, it’s like ensuring there’s only one unique copy of a particular object in your program, and you can access that object from anywhere in your code.

Let’s take a simple real-world example: the clipboard. Picture multiple applications or processes running on a computer, each attempting to access the clipboard concurrently. If each application were to create its own version of the clipboard to manage copy and paste operations, it could lead to conflicting data.
public class Clipboard {

    private String value;

    public void copy(String value) {
        this.value = value;
    }

    public String paste() {
        return value;
    }
}
In the above example, we've defined a Clipboard class capable of copying and pasting values. However, if we were to create multiple instances of Clipboard, each instance would hold its own separate data.
public class Main {
    public static void main(String[] args) {

        Clipboard clipboard1 = new Clipboard();
        Clipboard clipboard2 = new Clipboard();

        clipboard1.copy("Java");
        clipboard2.copy("Design patterns");

        System.out.println(clipboard1.paste()); // output: Java
        System.out.println(clipboard2.paste()); // output: Design patterns
    }
}
Clearly, this isn’t ideal. We expect both clipboard instances to display the same value. This is precisely where the Singleton pattern proves its worth.
public class Clipboard {

    private String value;

    private static Clipboard clipboard = null;

    // Private constructor to prevent instantiation from outside
    private Clipboard() {}

    // Method to provide access to the singleton instance
    public static Clipboard getInstance() {
        if (clipboard == null) {
            clipboard = new Clipboard();
        }
        return clipboard;
    }

    public void copy(String value) {
        this.value = value;
    }

    public String paste() {
        return value;
    }
}
By implementing the Singleton pattern, we ensure that only one instance of the Clipboard class exists throughout the program execution.
public class Main {
    public static void main(String[] args) {

        // Getting the singleton instances
        Clipboard clipboard1 = Clipboard.getInstance();
        Clipboard clipboard2 = Clipboard.getInstance();

        clipboard1.copy("Java");
        clipboard2.copy("Design patterns");

        System.out.println(clipboard1.paste()); // output: Design patterns
        System.out.println(clipboard2.paste()); // output: Design patterns
    }
}
Now, both clipboard1 and clipboard2 reference the same instance of the Clipboard class, ensuring consistency across the application.
2. Factory Design pattern
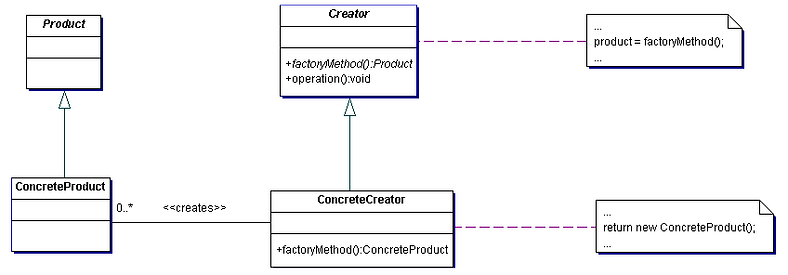
The Factory Design Pattern is a creational design pattern that provides an interface for creating objects in a super class but allows subclasses to decide which class to instantiate. In other words, it provides a way to delegate the instantiation logic to child classes.

Imagine you’re building a program that simulates a simple console based calculator. You have different types of operations like addition, subtraction, multiplication, division etc. Each operation has its own unique behavior. Now, you want to create these operation objects in your program based on customer choice.
The challenge is you need a way to create these operation objects without making your code too complex or tightly coupled. This means you don’t want your code to rely too heavily on the specific classes of operations directly. You also want to make it easy to add new types of operations later without changing a lot of code.
The Factory Design Pattern helps you solve this problem by providing a way to create objects without specifying their exact class. Instead, you delegate the creation process to a factory class.
- Define the product interface. (
Operation).
public interface Operation {
    double calculate(double number1, double number2);
}
2. Implement concrete products for each operation.
// for addition
public class AddOperation implements Operation{
    @Override
    public double calculate(double number1, double number2) {
        return number1 + number2;
    }
}

// for substration
public class SubOperation implements Operation{
    @Override
    public double calculate(double number1, double number2) {
        return number1 - number2;
    }
}

// for multiplication
public class MulOperation implements Operation{
    @Override
    public double calculate(double number1, double number2) {
        return number1 * number2;
    }
}

// for division
public class DivOperation implements Operation{
    @Override
    public double calculate(double number1, double number2) {
        if(number2 == 0)
            throw new ArithmeticException("Cannot divide by zero!");
        return number1 / number2;
    }
}

// An exception class invokes when user input invalid choice for operation
public class InvalidOperationException extends Exception{
    public InvalidOperationException(String message) {
        super(message);
    }

}
3. Create a factory class (OperationFactory) with a method (getInstance) to create objects based on some parameter.
public interface OperationFactory {
    Operation getInstance(int choice) throws InvalidOperation;
}

public class OperationFactoryImpl implements OperationFactory{
    @Override
    public Operation getInstance(int choice) throws InvalidOperationException {
        if(choice==1)
            return new AddOperation();
        else if(choice==2)
            return new SubOperation();
        else if(choice==3)
            return new MulOperation();
        else if(choice==4)
            return new DivOperation();
        throw new InvalidOperation("Invalid operation selected!");
    }
}
4. Use the factory to create objects without knowing their specific classes.
public static void main(String[] args) {
 Scanner scan = new Scanner(System.in);
 Output output = new ConsoleOutput();

 try {

   System.out.println("\n1. Addition(+)\n2. Subtraction(-)\n3. Multiplication(*)\n4. Division(/)");

   // getting choice from user
   System.out.println("\n\nSelect your operation (1-4): ");
   int choice = scan.nextInt()

   // getting 2 operands from user
   System.out.println("Enter first operand: ");
   double operand1 = scan.nextDouble();
   System.out.println("Enter second operand: ");
   double operand2 = scan.nextDouble();

   // create opeartion instance based on user choice
   OperationFactory operationFactory = new OperationFactoryImpl();
   Operation operation = operationFactory.getInstance(choice);

   // printing result
   System.out.println("\nThis result is " + operation.calculate(operand1, operand2) + ".");
 }
 catch (InputMismatchException e) {
   System.out.println("Invalid input type!\n");
 }
 catch (InvalidOperation | ArithmeticException e) {
   System.out.println(e.getMessage());
 }

 scan.close();
}
Here the Main class demonstrates the usage of the factory to create different operation objects without knowing their specific implementation classes (Loose coupling). It only interacts with the factory interface. Not only that, but we can also easily add new types of operations without changing existing client code. We are just needed to create a new concrete product and update the factory if necessary.
3. Builder pattern
the Builder Pattern provides a way to construct an object by allowing you to set its various properties (or attributes) in a step-by-step manner.
Some of the parameters might be optional for an object, but we are forced to send all the parameters and optional parameters need to send as NULL. We can solve this issue with large number of parameters by providing a constructor with required parameters and then different setter methods to set the optional parameters.
This pattern is particularly useful when dealing with objects that have many optional parameters or configurations.
Imagine we’re developing a user entity. Users have different properties like name, email, phone and city etc. Here name and email are required fields and phone and city are optional. Now, each person might have different combinations of these properties. Some might have city, others might not. Some might have phone, others might not. The Builder Design Pattern helps you create these users flexibly, step by step.
// Main product class
public class User {
    private String name; // required field
    private String email; //  required field
    private String phone; // optional field
    private String city; // optional field

    public User(UserBuilder userBuilder) {
        this.name = userBuilder.getName();
        this.email = userBuilder.getEmail();
        this.phone = userBuilder.getPhone();
        this.city = userBuilder.getCity();
    }

    public static UserBuilder builder(String name, String email) {
        return new UserBuilder(name, email);
    }

    @Override
    public String toString() {
        return "User = " +
                "{ name: '" + name + '\'' +
                ", email: '" + email + '\'' +
                ", phone: '" + phone + '\'' +
                ", city: '" + city + '\'' +
                " }";
    }

    // builder class
    public static class UserBuilder {
        private String name; // required field
        private String email; //  required field
        private String phone = "unknown"; // optional field
        private String city = "unknown"; // optional field

        public UserBuilder(String name, String email) {
            this.name = name;
            this.email = email;
        }

        // getters

        public UserBuilder name(String name) {
            this.name = name;
            return this;
        }

        public UserBuilder email(String email) {
            this.email = email;
            return this;
        }

        public UserBuilder phone(String phone) {
            this.phone = phone;
            return this;
        }

        public UserBuilder city(String city) {
            this.city = city;
            return this;
        }

        public User build() {
            return new User(this);
        }
    }

}UserBuilderclass: Is the inner builder class responsible for constructingUserobjects. It has fields representing the presence or absence of different properties (name,email,phone,city). The class provides setter methods for each properties, which return the builder itself (name(),phone(),city(),email()This enables method chaining.Userclass: Is the class represents the product you want to build using the builder pattern. It has private fields to represent the properties of the user (name,email,phone,city). The constructor ofUsertakes aUserBuilderobject and initializes its fields based on the builder's settings. There is a static methodbuilder()that returns a new instance ofUserBuilder, providing a convenient way to create a new builder.
Here’s an example of how you can use this code to create a user with optional properties:
public class Main {
    public static void main(String[] args) {

        User user1 = User
                .builder("John", "john@abc@gmail.com")
                .build();

        System.out.println(user1); // User = { name: 'John', email: 'john@abc@gmail.com', phone: 'unknown', city: 'unknown' }

        User user2 = User
                .builder("Mary", "mary@abc@gmail.com")
                .city("Colombo")
                .build();

        System.out.println(user2); // User = { name: 'Mary', email: 'mary@abc@gmail.com', phone: 'unknown', city: 'Colombo' }
    }

}
So that’s what builder patterns is guys. This pattern is useful when you have complex objects with many optional parameters, and it helps keep your code clean and easy to understand. It allows you to construct different variations of objects with the same builder, adjusting parameters as needed.
4. Adapter pattern
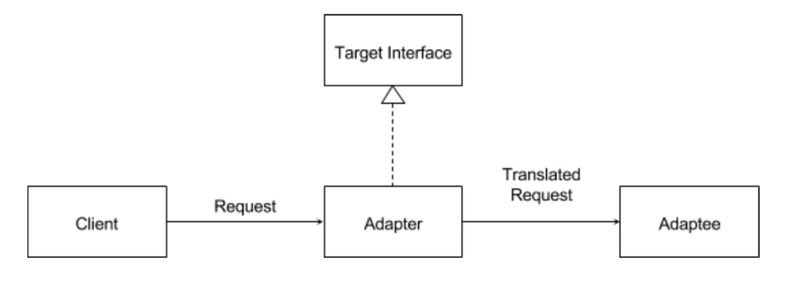
The Adapter pattern is a structural design pattern that allows objects with incompatible interfaces to work together. It acts as a bridge between two incompatible interfaces.
Imagine a situation where two classes or components perform similar tasks but have different method names, parameter types, or structures. The Adapter pattern allows these incompatible interfaces to work together by providing a wrapper (the adapter) that translates the interface of one class into an interface that the client expects.
- Target is the interface expected by the client.
- Adaptee is the class that needs to be adapted.
- Adapter is the class that implements the Target interface and wraps the Adaptee class.
- Client class is the class that uses the adapter to interact with the Adaptee through the Tareget interface.

// Target interface
interface CellPhone {
    void call();
}

// Adaptee (the class to be adapted)
class FriendCellPhone {
    public void ring() {
        System.out.println("Ringing");
    }
}

// Adapter class implementing the Target interface
class CellPhoneAdapter implements CellPhone {
    private FriendCellPhone friendCellPhone;

    public CellPhoneAdapter(FriendCellPhone friendCellPhone) {
        this.friendCellPhone = friendCellPhone;
    }

    @Override
    public void call() {
        friendCellPhone.ring();
    }
}

// Client class
public class AdapterMain {
    public static void main(String[] args) {
        // Using the adapter to make Adaptee work with Target interface
        FriendCellPhone adaptee = new FriendCellPhone();
        CellPhone adapter = new CellPhoneAdapter(adaptee);
        adapter.call();
    }
}
In this example:
CellPhoneis the target interface that your client code expects, and you do not have an implementation of it.FriendCellPhoneis the class you want to adapt/reuse (the Adaptee), which has a method namedringrather than creating new implementaion ofCellPhoneinterface.CellPhoneAdapteris the adapter class that implements theCellPhoneinterface and wraps an instance ofFriendCellPhone. Thecallmethod in the adapter delegates the call to theringmethod of theFriendCellPhoneclass.AdapterMainclass serves as the client that demonstrates the usage of the Adapter pattern in action.
Why adapter pattern?
- The Adaptee might be a class from a third-party library or a legacy codebase that you can’t modify directly. By using an adapter, you can adapt its interface to match the interface expected by the client without modifying the original code.
- The client might only require specific functionality from the Adaptee. By using an adapter, you can provide a tailored interface that exposes only the necessary functionality, rather than exposing the entire interface of the Adaptee.
- It might seem that you can achieve similar functionality by creating an instance of the
Targetinterface directly, using an adapter provides benefits in terms of code reusability, maintainability, and flexibility, especially when dealing with existing code or third-party libraries.
5. Decorator pattern
The Decorator Pattern is a design pattern in object-oriented programming that allows behavior to be added to individual objects, either statically or dynamically, without affecting the behavior of other objects from the same class.
In this pattern, there is a base class (or interface) that defines the common functionality, and one or more decorator classes that add additional behavior. These decorator classes wrap the original object, augmenting its behavior in a modular and flexible way.

Imagine, you are tasked with creating a drawing application that allows users to create and customize shapes with various decorations. It should be able to easily add new decorators for additional features without changing the existing code for shapes or other decorators.
Let’s see how we can achieve that using decorator pattern.
// Shape Interface
interface Shape {
    void draw();
    String getName();
}

// Concrete Shape: Circle
class Circle implements Shape {
    private String name;

    public Circle(String name) {
        this.name = name;
    }

    public String getName() {
        return name;
    }

    @Override
    public void draw() {
        System.out.println("Drawing circle, " + getName() + ".");
    }
}- Shape Interface: Defines the basic operations that all shapes should support. In this case, it includes the
draw()method to draw the shape andgetName()to get the name of the shape. - Circle Class: Implements the
Shapeinterface, representing a concrete shape (in this case, a circle). It has anameattribute and implements thedraw()method to draw a circle.
// Abstract Decorator Class
abstract class ShapeDecorator implements Shape {
    private Shape decoratedShape;

    public ShapeDecorator(Shape decoratedShape) {
        this.decoratedShape = decoratedShape;
    }

    @Override
    public void draw() {
        decoratedShape.draw();
    }

    @Override
    public String getName() {
        return decoratedShape.getName();
    }
}- ShapeDecorator Abstract Class: An abstract class implementing the
Shapeinterface. It contains a reference to aShapeobject (the decorated shape) and delegates thedraw()method to this object.
// Concrete Decorator: BorderDecorator
class BorderDecorator extends ShapeDecorator {
    private String color;
    private int widthInPxs;

    public BorderDecorator(Shape decoratedShape, String color, int widthInPxs) {
        super(decoratedShape);
        this.color = color;
        this.widthInPxs = widthInPxs;
    }

    @Override
    public void draw() {
        super.draw();
        System.out.println("Adding " + widthInPxs + "px, " + color + " color border to " + getName() + ".");
    }
}

// Concrete Decorator: ColorDecorator
class ColorDecorator extends ShapeDecorator {
    private String color;

    public ColorDecorator(Shape decoratedShape, String color) {
        super(decoratedShape);
        this.color = color;
    }

    @Override
    public void draw() {
        super.draw();
        System.out.println("Filling with " + color + " color to " + getName() + ".");
    }
}- BorderDecorator and ColorDecorator Classes: Concrete decorator classes that extend
ShapeDecorator. They add additional features to the decorated shapes, such as borders and colors. They override thedraw()method to add their specific functionality while also calling thedraw()method of the decorated shape.
// Main Class
public class DecoratorMain {
    public static void main(String[] args) {
        // Create a circle
        Shape circle1 = new Circle("circle1");

        // Decorate the circle with a border
        Shape circle1WithBorder = new BorderDecorator(circle1, "red", 2);

        // Decorate the circle with a color
        Shape circle1WithBorderAndColor = new ColorDecorator(circle1WithBorder, "blue");

        // Draw the decorated circle
        circle1WithBorderAndColor.draw();

        // output
        // Drawing circle, circle1.
        // Adding 2px, red color border to circle1.
        // Filling with blue color to circle1.
    }
}- DecoratorMain Class: Contains the
main()method where the decorator pattern is demonstrated. It creates a circle, decorates it with a border, and then further decorates it with a color. Finally, it calls thedraw()method to visualize the decorated shape.
Now, with the implementation of the Decorator Pattern, our drawing application gains the remarkable ability to embellish not only circles but also a plethora of geometric shapes such as rectangles, triangles, and beyond. Moreover, the extensibility of this pattern enables us to seamlessly integrate additional decorators, offering features like transparency, diverse border styles (solid, dotted), and much more. This dynamic enhancement capability, achieved without altering the core structure of the shapes, underscores the pattern’s prowess in promoting code reusability, flexibility, and scalability.
6. Observer pattern
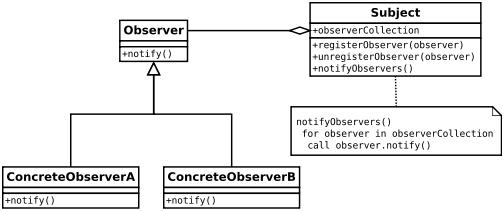
The Observer Pattern a behavioral design pattern commonly used in object-oriented programming to establish a one-to-many dependency between objects. In this pattern, one object (called the subject or observable) maintains a list of its dependents (observers) and notifies them of any state changes, usually by calling one of their methods.
Here’s how it works:
- Subject: This is the object that holds the state and manages the list of observers. It provides methods to attach, detach, and notify observers.
- Observer: This is the interface that defines the method(s) that the subject calls to notify the observer of any state changes. Typically, observers implement this interface.
- Concrete Subject: This is the concrete implementation of the subject interface. It maintains the state and sends notifications to observers when the state changes.
- Concrete Observer: This is the concrete implementation of the observer interface. It registers itself with a subject to receive notifications and implements the update method to respond to state changes.

In the context of a YouTube channel subscriber scenario, the YouTube channel is the subject, and the subscribers are the observers. When an event happens in a YouTube channel, it notifies all its subscribers about the new video so they can watch it.
Let’s implement this example in code,
public enum EventType {
    NEW_VIDEO,
    LIVE_STREAM
}

public class YoutubeEvent {
    private EventType eventType;
    private String topic;

    public YoutubeEvent(EventType eventType, String topic) {
        this.eventType = eventType;
        this.topic = topic;
    }

    // getters ans setters

    @Override
    public String toString() {
        return eventType.name() + " on " +  topic;
    }
}- EventType: The
EventTypeenum defines the types of events that can occur, such asNEW_VIDEO,LIVE_STREAMand more. - Event: The
YoutubeEventclass represents the events that occur in the system. It contains information such as the type of event and the topic.
public interface Subject {

    void addSubscriber(Observer observer);
    void removeSubscriber(Observer observer);
    void notifyAllSubscribers(YoutubeEvent event);

}

public interface Observer {
    void notifyMe(String youtubeChannelName, YoutubeEvent event);
}- Subject: The
Subjectinterface declares methods to manage subscribers (addSubscriberandremoveSubscriber) and to notify them (notifyAllSubscribers) when an event occurs. - Observer: The
Observerinterface declares a method (notifyMe) that subjects call to notify observers of any change in state.
package observer;

import java.util.ArrayList;
import java.util.List;

public class YoutubeChannel implements Subject{

    private String name;
    private List<Observer> subscribers = new ArrayList<>();

    public YoutubeChannel(String name) {
        this.name = name;
    }

    public String getName() {
        return name;
    }

    @Override
    public void addSubscriber(Observer observer) {
        subscribers.add(observer);
    }

    @Override
    public void removeSubscriber(Observer observer) {
        subscribers.remove(observer);
    }

    @Override
    public void notifyAllSubscribers(YoutubeEvent event) {
        for(Observer observer: subscribers) {
            observer.notifyMe(getName(), event);
        }
    }
}- Concrete Subject: The
YoutubeChannelclass implements theSubjectinterface. It maintains a list of subscribers and notifies them when a new event occurs.
package observer;

public class YoutubeSubscriber implements Observer{
    private String name;

    public YoutubeSubscriber(String name) {
        this.name = name;
    }

    public String getName() {
        return name;
    }

    public void setName(String name) {
        this.name = name;
    }

    @Override
    public void notifyMe(String youtubeChannelName, YoutubeEvent event) {
        System.out.println("Dear " + getName() + ", Notification from " + youtubeChannelName + ": " + event);
    }
}- Concrete Observer: The
YoutubeSubscriberclass implements theObserverinterface. It defines the behavior to be performed when notified by a subject.
public class ObserverMain {
    public static void main(String[] args) throws InterruptedException {
        YoutubeChannel myChannel = new YoutubeChannel("MyChannel");

        Observer john = new YoutubeSubscriber("John");
        Observer bob = new YoutubeSubscriber("Bob");
        Observer tom = new YoutubeSubscriber("Tom");

        myChannel.addSubscriber(john);
        myChannel.addSubscriber(bob);
        myChannel.addSubscriber(tom);

        myChannel.notifyAllSubscribers(new YoutubeEvent(EventType.NEW_VIDEO, "Design patterns"));
        myChannel.removeSubscriber(tom);
        System.out.println();
        Thread.sleep(5000);
        myChannel.notifyAllSubscribers(new YoutubeEvent(EventType.LIVE_STREAM, "JAVA for beginners"));

    }
}- Main Class: The
ObserverMainclass contains themainmethod where we test our implementation. It creates aYoutubeChannelinstance, adds subscribers to it, notifies them of new video event, and removes one of the subscribers and again notifies them of a live stream event.
// output
Dear John, Notification from MyChannel: NEW_VIDEO on Design patterns
Dear Bob, Notification from MyChannel: NEW_VIDEO on Design patterns
Dear Tom, Notification from MyChannel: NEW_VIDEO on Design patterns

Dear John, Notification from MyChannel: LIVE_STREAM on JAVA for beginners
Dear Bob, Notification from MyChannel: LIVE_STREAM on JAVA for beginners
By using the Observer design pattern, the YouTube channel can easily notify all its subscribers whenever a new video is uploaded without tightly coupling the channel and its subscribers. This promotes a more flexible and maintainable design.
In conclusion, design patterns are indispensable tools for Java developers, offering proven solutions to recurring design problems and promoting code reusability, maintainability, and scalability. By understanding and implementing these patterns effectively, developers can craft robust, flexible, and easily maintainable software solutions. While mastering design patterns requires practice and experience, the benefits they bring to software development are invaluable. Whether you’re working on a small project or a large-scale enterprise application, leveraging design patterns empowers you to write cleaner, more efficient code and ultimately become a more proficient Java developer.


No comments:
Post a Comment
Note: Only a member of this blog may post a comment.