Playwright With Javascript | Introduction
Playwright enables reliable end-to-end testing for modern web apps
- Application Supported - Web browser apps, Mobile Web apps, API
- Languages Supported - Javascript , Typescript , Java , Python & .Net (C#)
- Browsers Supported - Chromium , WedKit(Safari) and Firefox(headed / headless)
- OS Supported - Windows , MacOS , Linux , Support CI Runs
- Features Playwright:
- Free & Open source
- Multi-Browser , Multi-Language , Multi-OS support
- Easy setup and configuration
- Functional , API accessibility testing
- Built-in reporters , custom reports
- CI , CD , Docker
- Parallel testing
- Auto wait
- Built-in assertions
- Multi tab &multi window
- Frames , shadow dom
- Test Parameter
- Emulate mobile devices
- Faster
Selenium Vs Playwright Vs Cypress differences:- Nodejs: Install nodejs if not available in your computer
- to find node version use
- node -v or node --version
- to find the npm version use
- npm -v or npm --version
- Nodejs: Install nodejs if not available in your computer
- to find node version use
- node -v or node --version
- to find the npm version use
- npm -v or npm --version
-
- VS Code : download VScode editor
- Create project folder--> open in VS code
- install playwright using terminal
- npm init playwright@latest
Run the install command and select the following to get started:
- Choose between TypeScript or JavaScript (default is TypeScript)
- Name of your Tests folder (default is tests or e2e if you already have a tests folder in your project)
- Add a GitHub Actions workflow to easily run tests on CI
- Install Playwright browsers (default is true)
What's Installed
Playwright will download the browsers needed as well as create the following files.
playwright.config.ts
package.json
package-lock.json
tests/
  example.spec.ts
tests-examples/
  demo-todo-app.spec.ts
The playwright.config is where you can add configuration for Playwright including modifying which browsers you would like to run Playwright on.
If you are running tests inside an already existing project then dependencies will be added directly to your package.json.
The tests folder contains a basic example test to help you get started with testing. For a more detailed example check out the tests-examples folder which contains tests written to test a todo app.
- package . json ---node project management file
- playwright . config . js -- playwright configuration
- tests --- we can wright all the playwright tests
- npm playwright -v -- return installed version of playwright .
Playwright will download the browsers needed as well as create the following files.
playwright.config.ts
package.json
package-lock.json
tests/
example.spec.ts
tests-examples/
demo-todo-app.spec.ts
The playwright.config is where you can add configuration for Playwright including modifying which browsers you would like to run Playwright on.
If you are running tests inside an already existing project then dependencies will be added directly to your package.json.
The tests folder contains a basic example test to help you get started with testing. For a more detailed example check out the tests-examples folder which contains tests written to test a todo app.
- install playwright using vs code extension
- run the playwright test
- npx playwright test
- npx playwright test --headed
- npx playwright show-report
- How to Create and Run playwright Tests:
- npx playwright test runs all tests on all browsers in headless mode
- npx playwright test My Test . spec . js runs a specific test file
- npx playwright test My Test . spec . js --project=chromium runs on specific browser
- npx playwright test My Test . spec .js --project =chromium --headed
- npx playwright test My Test . spec .js --project =chromium --headed --debug
In JavaScript Playwright test blocks, async and await are used to handle asynchronous operations in a clear and concise manner. They enable the test to pause execution until an asynchronous operation (such as navigating to a page, clicking a button, or waiting for an element) completes, which is essential for ensuring that the browser state is ready for the next test step.
What is async?
The async keyword is used to declare a function as asynchronous. This means the function will return a Promise, allowing the use of await within it to pause execution until the Promise is resolved.
Example:
test('Sample Test', async () => {
console.log('Before wait');
await new Promise(resolve => setTimeout(resolve, 2000)); // Waits for 2 seconds
console.log('After wait');
});
What is await?
The await keyword is used inside an async function to pause the execution of the function until the Promise it is waiting for is resolved. It makes the code appear synchronous, even though the operations are asynchronous.
Why use async and await in Playwright?
Playwright's APIs are asynchronous because they interact with the browser in real time. Actions like navigating to a page, clicking an element, or waiting for a condition all return Promises. Using async and await ensures that each action completes before moving on to the next, which is crucial for test reliability.
const { test, expect } = require('@playwright/test');
test('Example Playwright Test', async ({ page }) => {
// Navigate to a page
await page.goto('https://example.com');
// Type text into an input field
await page.fill('#username', 'testuser');
// Click a button
await page.click('#login');
// Wait for an element to be visible
await page.waitForSelector('#dashboard');
// Assert that the dashboard title is correct
const title = await page.title();
expect(title).toBe('Dashboard');
});
Key Points:
asyncFunction: Makes the function return aPromise, enabling the use ofawait.awaitKeyword: Waits for the resolution of a Promise before proceeding to the next line.- Readability: Simplifies the handling of sequential asynchronous operations, avoiding deeply nested
.then()calls (callback hell).
Benefits in Playwright:
- Ensures each action completes before the next starts, avoiding race conditions.
- Improves test readability and maintainability.
- Makes debugging easier by mimicking a synchronous flow for asynchronous operations.
Playwright Test for VS CodeThis extension integrates Playwright into your VS Code workflow. Here is what it can do: RequirementsThis extension works with Playwright version v1.38+ or newer. Install PlaywrightIf you don't have the Playwright NPM package installed in your project, or if you are starting with a new testing project, the "Install Playwright" action from the command panel will help you get started. Pick the browsers you'd like to use by default, don't worry, you'll be able to change them later to add or configure the browsers used. You can also choose to add a GitHub Action so that you can easily run tests on Continuous Integration on every pull request or push. The extension automatically detects if you have Playwright installed and loads the browsers, known as Playwright projects, into Visual Studio Code. By default it will select the first project as a run profile. Inside the test explorer in VS Code you can change this behavior to run a single test in multiple or different browsers. Run tests with a single clickClick the green triangle next to the test you want to run. You can also run the test from the testing sidebar by clicking the grey triangle next to the test name. Run multiple testsYou can use the Testing sidebar to run a single test or a group of tests with a single click. While tests are running, the execution line is highlighted. Once the line has completed, the duration of each step of the test is shown. Run tests in watch modeClick the "eye" icon to run tests in watch mode. This will re-run the watched tests when you save your changes. Show browsersCheck the "show browsers" checkbox to run tests with the browser open so that you can visually see what is happening while your test is running. Click on "close all browsers" to close the browsers. Show trace viewerCheck the "show trace viewer" checkbox to see a full trace of your test. Pick locatorsClick the "pick locator" button and hover over the browser to see the locators available. Clicking an element will store it in the locators box in VS Code. Pressing enter will save it to the clip board so you can easily paste it into your code or press the escape key to cancel. Debug step-by-step, explore locatorsRight click and start breakpoint debugging. Set a breakpoint and hover over a value. When your cursor is on some Playwright action or a locator, the corresponding element (or elements) are highlighted in the browser. Tune locatorsYou can edit the source code to fine-tune locators while on a breakpoint. Test out different locators and see them highlighted in the browser. Record new testsRecord new tests by clicking on the "record tests" button in the testing sidebar. This will open a browser window where you can navigate to a URL and perform actions on the page which will be recorded to a new test file in VS Code. Record at cursorThis generates actions into the existing test at the current cursor position. You can run the test, position the cursor at the end of the test and continue generating the test. | Works withUniversal More Info
|
- Locating Element in Playwright
- Property
- css
- xpath
- Locate single element
- link/button:
- await page . locator ('locator').click()
- await page . click(locator);
- inputbox:
- await page. locator('locator').fill('value')
- await page .locator('locator') .type('value')
- await page . fill('locator', 'value')
- await page . type('locator' , 'value')
- Locate multiple wed element
- const element=await page.$$(locator)
- Built-in in locators.
- page. getByRole() to locate by explicit and implicit accessibility attributes.
- page. getByText() to locate by text content.
- page. getByLabe() to locater a form control by associated label's text.
- page . getByPlaceholder() to locate an input by placeholder.
- page . getByAltText() to locate an element, usually image , by its text alternative.
- page . getByTitle() to locate an element by its title attribute.
- page . getByTestId() to locate an element based on its data-testid attribute.
- program with above locators;
- const{test,expect} = require('@playwright/test');
- test('Verify opencart homepage title', async ({ page }) =>{//navigate to the urlawait page.goto('https://opensource-demo.orangehrmlive.com/web/index.php/auth/login
- ');
- //page . getByAltText () - to locate an element , usually image , by its text alternative.
- const logo=await page. getByAltText('company-branding')
- await expect(logo). toBeVisible();
- //page. getByPlaceholder() - locate an input by placeholder.
- await page. getByplaceholder('Username') .fill("Admin")
- await page. getByPlaceholder('Password') . fill("admin123")
- await page . getByRole('button' ,{type: 'submit'} ) .click()
- const name =await page . locator('//p[@class="oxd-userdropdown-name"]') .textContent()
- await expect(await page . getByText(name) ) .toBeVisible()
- })
Select options:
How to handle Bootstrap multi select DropDown
How to Handle Autocomplete in Playwright
Assertion:
Playwright Assertions validate the behaviour of App Under Test. It decides whether the application is behaving as per expectations or not, based on which it assigns Fail or Pass to a Test Case.
By incorporating assertions into Playwright tests, you can confirm that the application performs as intended, enhancing the reliability and quality of the software.
What are Playwright Assertions?
Playwright Assertions are a set of built-in functions which includes expect() functionprovided by the Playwright testing framework to validate the behavior and state of a web application during automated tests.
Playwright Assertions are used to verify whether specific conditions are met, such as checking if an element exists, contains certain text, or has a particular state. These assertions are essential for confirming that the application behaves as expected during end-to-end testing.
Playwright provides diverse assertion types:
- Element States: Check the visibility, availability, and interactivity of UI elements.
- Content Validation: Ensure elements display the correct text, values, or match specific patterns.
- Page Properties: Assertions can confirm page details like URLs, titles, or cookie presence.
- Network Interactions: Verify the outcomes of network requests and responses to ensure proper data loading and form submissions.
Playwright Expect() Function
Playwright provides assertion using expect() function. Using expect() you can assert the expected result with actual result
By default Assertion will abort the test as soon as the expected result is not matched with the actual result. There are cases where we have to check multiple assertions and at the end of the test throw the assertion error.
Soft assertion is good for cases where we want to assert multiple cases and then fail the test at the end.
Below is the example test. The test has two assertions and both will execute and fail.
test("example for soft assertion", async ({page}) => {

 await page.goto("https://bstackdemo.com/")

 const filter = await page.locator(".filters .filters-available-size")

 const filterCount = await filter.count()

 await expect.soft(filterCount).not.toEqual(4)

 await expect.soft(page).toHaveTitle("StackDemo!")

})
Negating Matchers
Negating Matchers are used when we want to check that a certain condition does not hold true. It essentially reverses the condition you’re checking for, enabling you to assert the absence of a condition or element. Negating Matchers are especially helpful for ensuring that a web page or application is free from errors, incorrect states, or unwanted elements.
Below is the example test. The test will assert for filter count not matching the value 3
test("example for negating matcher", async ({page}) => {

 await page.goto("https://bstackdemo.com/")

 const filter = await page.locator(".filters .filters-available-size")

 const filterCount = await filter.count()

 await expect(filterCount).not.toEqual(3)

})
Assert Non-Presence
Assert the non-presence of elements or messages, particularly useful in validating error handling and user feedback:
await expect(page.locator('text=Error')).not.toBeVisible();
-----------------------------------------------------
Assert Network Interactions
Capture and assert network responses to ensure backend integration is functioning as expected:
const [response] = await Promise.all([
  page.waitForResponse(resp => resp.url().includes('/api/submit') && resp.status() === 200),
  page.click('button#submit')
]);
await expect(response).toBeOK();
------------------------------------------------------------
handle checkboxes
How to Handle Dialogs Or Alerts | alert(),confirm(), prompt()
Playwright can interact with the web page dialogs such as alert, confirm, prompt as well as beforeunload confirmation. For print dialogs, see Print.
alert(), confirm(), prompt() dialogs
By default, dialogs are auto-dismissed by Playwright, so you don't have to handle them. However, you can register a dialog handler before the action that triggers the dialog to either dialog.accept() or dialog.dismiss() it.
How to Handle Frames/iFrames:
A Page can have one or more Frame objects attached to it. Each page has a main frame and page-level interactions (like click) are assumed to operate in the main frame.
A page can have additional frames attached with the iframe HTML tag. These frames can be accessed for interactions inside the frame.
// Locate element inside frame
const username = await page.frameLocator('.frame-class').getByLabel('User Name');
await username.fill('John');
Frame objects
One can access frame objects using the page.frame() API:
// Get frame using the frame's name attribute
const frame = page.frame('frame-login');

// Get frame using frame's URL
const frame = page.frame({ url: /.*domain.*/ });

// Interact with the frame
await frame.fill('#username-input', 'John');Inner frames:
Handle Web Tables:
How to start with Playwright Debugging?
What is Debugging, and why is it important?
Debugging is finding the root cause of the issue and resolving it. It is vital to the testing process because of it:
- Helps resolve the issues quickly
- Identify the exact root cause
- Eliminates complexities
- Serves as proof to analyze the software quality
- It provides a way to validate functionality by applying dynamic values
A debugging process consists of the following steps:
- Note down the error
- Assume the error location based on the expertise
- Set the debugger breakpoints
- Analyze the code during run time step by step.
- Find the exact location that is causing the issue
- Fix the line of code which is causing the issue
- Validate the code for a successful fix of the error.
How to run Playwright debug mode?
One of the key features of Playwright is debugging tests in the following ways:
- Playwright Inspector
- Playwright Trace Viewer
- Browser Developer Tools
- Visual Studio Code debugger
- Verbose API logs
Debugging using Playwright Inspector
What is a Playwright Inspector?
Playwright Inspector is a GUI tool that comes with the framework by default, and no additional configuration is required to use this tool.
To launch your test with Playwright Inspector mode, you need to prefix the test command with PWDEBUG=1 depending on the command-line tool you are using, the syntax might differ.
Powershell
$env:PWDEBUG=1

npx run test
Bash
PWDEBUG=1 npx run testBatch
set PWDEBUG=1

npx run test
Once you enter the command, the UI window also known as Inspector windows opens and shows the line is being executed. You can debug the test line by line using this window.
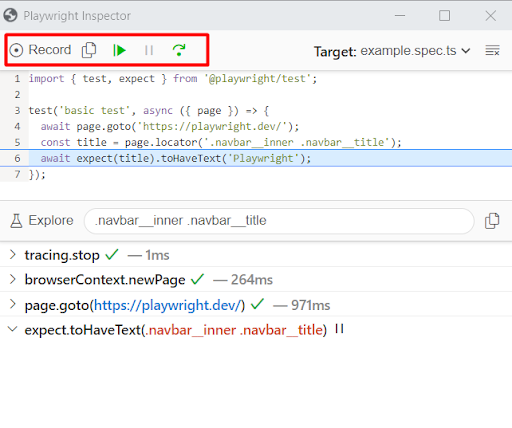 Points to Remember when using PWDEBUG=1 flag:
- The browser launches in headed mode by default.
- There will be no default time-out.
- Playwright Inspector window is split into two parts: the upper part shows your code, and the lower part code shows the execution log.
- The Playwright provides two options either you can resume the script or you can step over.
- If you want to pause the test at the desired line use await page.pause(); in your script.
- If you add the await page.pause() playwright automatically opens the Inspector Window even though you have not set the PWDEBUG=1 flag.
Any time, if you don’t want to attach the Playwright inspector, change the PWDEBUG flag to 0 i.e PWDEBUG=0
Recording Scripts using Playwright Inspector Tool
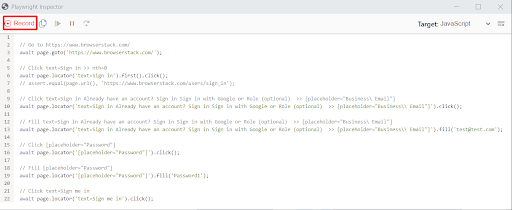
Sometimes you might find it challenging to understand how the locators simulate flows using scripts. Playwright Inspector Tool also provides a command called codegen, Popularly known as Playwright codegen that allows us to record the scripts automatically.
The codegen is like a recording tool. However, you can use this to generate complex scripts and later paste them inside our test case.
From the terminal, you can enter the below command to record the tests using Playwright Codegen Tool
npx playwright codegen <webpage_url>Example:
npx playwright codegen browserstack.comOnce the above command is entered in the terminal, the Playwright inspector window launches. The record button in the inspector window helps to start or stop the recording at any desired point. As the browser opens baseURL, you can navigate the actions or workflows.
Upon completing the recording, stop the recording, Save/Copy the recorded script, and close the Playwright inspector window.
Playwright Debugging using Browser Developer Tools
DevTools are part of the browser, which enables easy debugging. While most browsers have this functionality, the shortcut key might differ from browser to browser. On your browser window right click and choose inspect element. If you are using a chromium-based browser, you can also choose CTRL +SHIFT + I or F12 to open DevTools windows.
Browser Developer tools are popularly known as DevTools. The browser developer tools are still accessible when running playwright tests.
Some of the actions that can be performed using Browser Developer Tools are:
- Inspect DOM Element
- Run commands in the browser console.
- Check console logs during execution
- Verify Network calls/requests in the Network tab
Apart from the actions listed above, any action that can be performed on a normal browser while working with webpages can be done using browser developer tools with Playwright.
Working with Playwright Object in Browser Developer Tools console (Chrome DevTools Console).
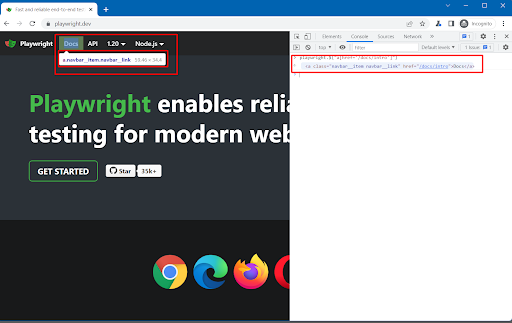
The Playwright allows you to highlight selectors in your browser console with the Playwright object. This is the most useful option, it helps debug locators and view the locators rendered during run time.
To utilize this option, Playwright needs to be launched in debug mode as explained above (using PWDEBUG=1 flag). Once you launch the Playwright test with debug mode, the Playwright Object is available in the browser console.
There are many ways to highlight the locators using playwright objects, such as:
- playwright.$(selector): Highlights the first occurrence of the selector. This is equivalent to a page.$ usage in the script.
- playwright.$$(selector): Highlights all occurrences of the selector. This is equivalent to a page.$$ usage in the script.
- playwright.inspect(selector): Inspects the selector in the Elements panel.
- playwright.locator(selector): Highlights the first occurrence of the locator.
- playwright.clear(): Clears existing highlights.
- playwright.selector(element): Generates a selector that points to the element.
Example:
playwright.$("a[href='/docs/intro']")The above command in the browser console highlights the web element containing with locator a[href=’/docs/intro’]
Playwright Debugging using Visual Studio Code
Playwright works well with Visual Studio Code. Suppose you are familiar with Java or C# and seek to debug using IDE breakpoints or the traditional debugging style by setting and unsetting breakpoints. In that case, Playwright provides the same way of debugging options.
To debug Playwright scripts using VS Code, follow the below steps.
Step 1: Navigate to Visual Studio Code Run Menu > Click on Add Configuration
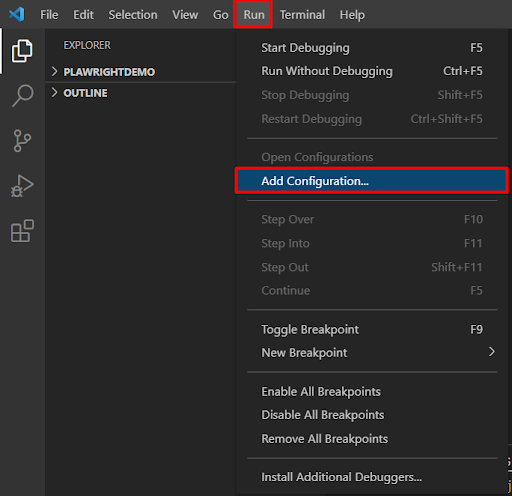
Step 2: Choose NodJS as an Environment

Step 3: The launch.json will be created inside our project folder automatically. You can check the file under
<Project_Folder>/.vscode/launch.json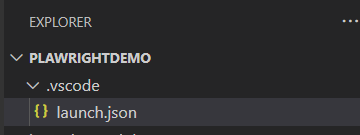
Step 4: Edit launch.json file and enter the below code to it.
{

    "version": "0.2.0",

    "configurations": [

        {

            "type": "pwa-node",

            "request": "launch",

            "name": "Launch Program",

            "skipFiles": [

                "<node_internals>/**"

            ],

            "program": "${file}",

            "runtimeExecutable": "npm",

            "runtimeArgs": [

                "run-script",

                "test"

            ],

        }

    ]

}
Step 5: Add test command/value to script property in package.json. The package.json should be located in the project root directory (Note: If package.json is not available in your Project root directory, then you can create one using npm init command). Enter the below code to the package.json and save the configuration.
  "scripts": {

    "test": "npx playwright test --headed"

  }
Step 6: Run with Configuration in Visual Studio Code by following the below steps
- Set the breakpoint in your code with VSCode IDE
- Launch the test with Run (Menu) > Start Debugging or F5
- The test starts with the debugger attached, the test execution should halt when it hits your breakpoint.

Debugging Playwright Tests with Trace Viewer
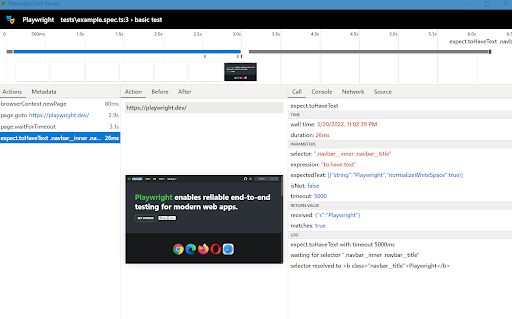
Trace Viewer is another functionality that can be used while Playwright debugging. Trace Viewer is a GUI tool that shows the traces recorded during test execution. Trace viewers can be opened using CLI or on the browser.
Recording Trace in Playwright
To record Trace, you need to configure it in the Global config file, and then follow these steps:
Step 1: Create a Global Playwright Config File i.e playwright.config.ts
Step 2: Place the playwright.config.ts under the Project root directory
Step 3: Add the below code in it
// playwright.config.ts

import { PlaywrightTestConfig } from '@playwright/test';

const config: PlaywrightTestConfig = {

  use:{

    trace:'on'

  },

};

export default config;
In the above code, the trace option has on value, likewise, you can provide different values from the list of available options for trace
- ‘off’ – Do not record a trace.
- ‘on’ – Record a trace for each test.
- ‘retain-on-failure’ – Record a trace for each test, but remove it from successful test runs.
- ‘on-first-retry’ – Record a trace only when retrying a test for the first time.
Once you run the test after configuring the trace option to the global config file. Trace will be recorded and stored in the test-results directory.
Traces of your tests will be recorded action-wise. Each action contains
- action snapshots,
- action log,
- source code location,
- network log for this action
Viewing Traces in Playwright
You can view the recorded Traces by following the below steps:
Step 1: Run/Execute your test
Step 2: Look for traces.zip inside your test-results folder
Step 3: From CLI you can enter the path to trace file in the following format
npx playwright show-trace <path_to_trace.zip_directory>/trace.zipFor Example:
npx playwright show-trace test-results\tests-example-basic-test\trace.zipStep 4: Open trace.zip from the browser (Optional). Navigate to https://trace.playwright.dev/ and then drag and drop the trace.zip folder as seen below
Debug tests with Playwright Verbose Logging
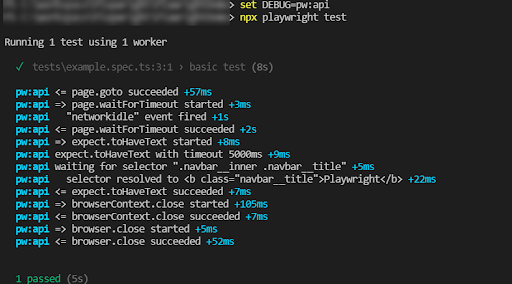
Amidst the several debugging options provided by Playwright, Verbose logging is another way to debug Playwright tests where the QA can see the verbose logs and analyze the scripts.
Enabling Verbose Logging in Playwright
The enabling of verbose logging depends on which type of CLI/Terminal you use.
Enable Verbose Logging with Bash
DEBUG=pw:api npx playwright test
Enable Verbose Logging with Powershell
$env:DEBUG="pw:api"
npx playwright test
Enable Verbose Logging with Batch
set DEBUG=pw:api
npx playwright test
Once you enable the Verbose Log, Playwright continuously feeds the logs to the command line so you can see what’s happening during the script execution.
======================================================
Page Object Model with Playwright: Tutorial
What is a Page Object Model?
Popularly known as POM, Page Object Model is a design pattern that creates a repository for storing all web elements. It is useful in reducing code duplication and improves test script maintenance.
In Page Object Model, consider each web page of an application as a separate class file. Each class file will contain only corresponding web page elements. Using these elements, testers can perform operations on the website under test.
What is Page Object Model in Playwright?
Page Object Model in Playwright is a design pattern used i to create a structured approach for managing interactions with web pages. POM in Playwright helps in organizing test code by separating the representation of the web pages from the test logic, making tests more maintainable and readable.
Advantages of Page Object Model in Playwright
- Easy Maintenance: In web automation, everything depends on the DOM tree and selectors. The page object model makes maintenance easier even if there is a change in the DOM tree and selectors we don’t have to modify everywhere.
- Increased Reusability: Using POM, we can reuse the code which is written for another test. Also, we can create custom helper methods to achieve this. Code Reusability reduces the code, thus saving time and effort.
- Readability: As the tests are independent, it increases the readability
- Reduced Code Duplication: Common page interactions are encapsulated within the page objects, allowing multiple tests to reuse the same methods and reducing redundancy.
- Better Test Management: Grouping related actions and elements within a page object leads to a more coherent and manageable test suite.
- Enhanced Debugging: POM offer clear traceability. So, when a test fails, it’s easier to identify the issue within the specific page object rather than sifting through multiple test scripts.

Disadvantages of Page Object Model in Playwright
- Initial Setup Time: Initial design and building framework take some time.
- Advanced Skillset: Good coding skills are required to set the POM framework
- Higher Risk: Elements are stored in a shared file, so even a tiny mistake in the page object file can lead to breaking the whole test suite.
- Increased Complexity: For simple applications or small test suites, the POM can introduce unnecessary complexity by requiring additional classes and methods.
- Tight Coupling of Interdependencies: If page objects are not well-designed, they can become tightly coupled, making it difficult to modify one without affecting others.
- Limited Flexibility: The rigid structured nature of POM can make it harder to adapt to new testing strategies or tools without significant rework.
Implementing Page Object Model in Playwright
Pre-Requisites:
- Install Visual Studio Code: Download and Install Visual Studio Code(VSCode).
- Install NodeJS: Download and Install Node JS
Steps to get started with Page Object Model in Playwright
Step 1: Create a fresh new directory (ex: PlaywrightDemo) in VSCode
Step 2: Open Directory in Visual Studio Code. From VS code
Click on File > Open Folder > Choose newly Created Folder (PlaywrightDemo)
Step 3: From the VS Code, Click on Terminal Menu > Click on New Terminal
Step 4: Enter the below command to start the Playwright installation
npm init playwright@latestNote: The above command asks a set of questions. Please provide appropriate inputs. In this tutorial, we are using typescript language.
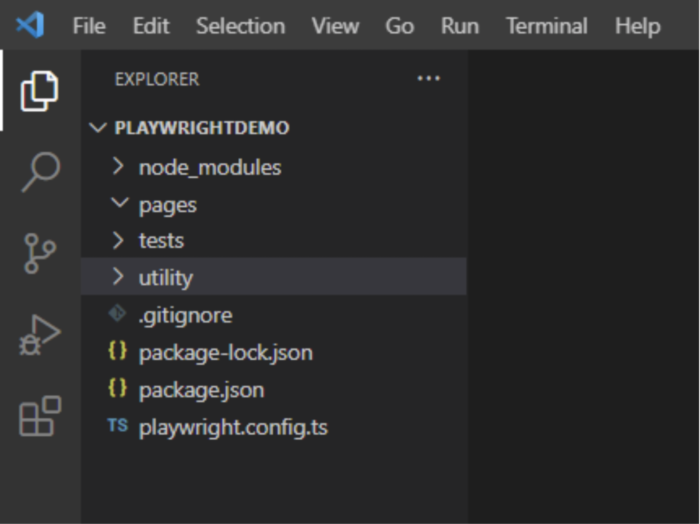
Once you run the above command, the below set of files and folders will be automatically created
- tests folder: This folder contains actual test scripts. By default, an example.spec.ts file will be created inside this folder.
- .gitignore: This file helps if you are using git repository
- package.json and package-lock.json: This file helps to track dependencies, create a shortcut for running tests, etc.
- playwright.config.ts: This is the global configuration file for the Playwright, which you can configure with available options.
Set up/Add additional folders for Playwright page object model
- pages folder: Since we are using Page Object Model (POM) pattern the pages folder contains all the relevant page objects
- utility folder: The common code/function, which can be used in different tests can be placed here. For example, generating a random number, getting a date and time, etc.
Step 5: Install Browsers
Install browsers using the command
npx playwright installOnce you complete the above steps, your Playwright Test Automation Project/ Framework should look like the below.
Let’s consider a simple scenario.
Navigate to the Browserstack home page.
Click on Products Menu
Verify All Submenus are Present
Step 6: Create a page object file inside the pages folder and name it home.page.ts
To achieve the above flow, we need a URL, menu element, etc.
//home.page.ts
import { expect, Locator, Page } from '@playwright/test';
export class BrowserstackHomePage {
readonly url ="https://www.browserstack.com/";
readonly page: Page;
readonly browserstackLogo: Locator;
readonly productsMenu: Locator;
readonly productmenudropdown:Locator

constructor(page: Page) {
this.page = page;
this.browserstackLogo = page.locator('#logo');
this.productsMenu = page.locator('#product-menu-toggle');
this.productmenudropdown = page.locator('#product-menu-dropdown >div > ul >li >a >div[class="dropdown-link-heading"]');
}

async goto(){
await this.page.goto(this.url);
}
async clickOnProducts(){
await this.productsMenu.waitFor({state:"visible"});
await this.productsMenu.click();
}
}
Step 7: Create a test using the above page object file.
Create a test file inside the tests folder and name it home.test.ts
To create a test, we need to import the page object file. Like below.
import { BrowserstackHomePage } from '../pages/home.page';
Once we import, we need to write the script and verify the submenus.
// home.test.ts
import { test, expect } from '@playwright/test';
import { BrowserstackHomePage } from '../pages/home.page';
test('Browserstack homepage verification', async ({ page }) => {
const homepage = new BrowserstackHomePage(page);
await homepage.goto();
await homepage.clickOnProducts();
await expect(homepage.productmenudropdown).toContainText(["Live", "Automate", "Percy", "App Live", "App Automate"])
});
After the creation of the above test file, your project looks like below
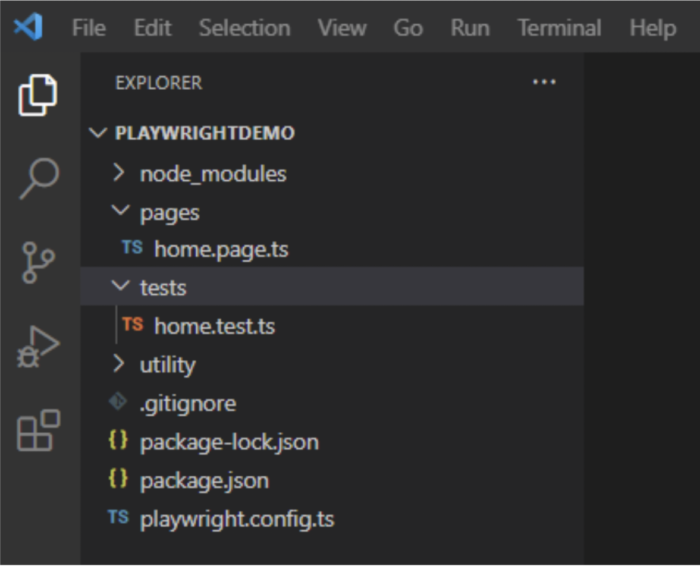
Step 8: Execute your test.
Execute you are using the below command
npx playwright testBy default Playwright test runs in headless mode, to run in headed mode use -– headed flag.
npx playwright test -–headed
Now that you have the tutorial in place, know that Playwright is supported by Browserstack which provides thousands of real devices where we can verify applications on real devices. A few advantages of Playwright are:
- Easy Setup and Configuration
- Multi-Browser Support
- Multi-Language Support
- Parallel Browser Testingomes in handy when multiple web pages have to be tested simultaneously.
- Built-in Reporters:
- Typescript Support out of the box
- CI/CD Integration Support
- Debugging Tools Support
Using Browserstack Integration with Playwright we can integrate our Playwright tests and make automation testing easier through robust design patterns. Not only that, speed up your Playwright tests by 30x with parallel testing to expand your test and browser coverage without compromising on build times.
Mouse Hover in Playwright || Handle Menu - Sub Menu Items
How to handle Authentication Pop Up (Basic Auth) With Playwright
BrowserContext in Playwright || Handle Two different user sessions with BrowserContext
Playwright with Javascript | How to Handle WebTable/Pagination Table
How to Handle Date Pickers/Calendars
How To handle Multiple Pages/Windows | Browser Context
How to Tag playwright tests
How To Maximize Browser Window In playwright | Viewport In Playwright
How To Retry Failed Test Cases in Playwright | Test Retry In Playwright
Playwright with Javascript | Grouping Tests - Describe Block
Playwright with Javascript | Annotations | Only, Skip,Fail, Fixme & Slow
How to Run a Specific Spec File in Playwright Tests Sequentially
If you've ever been in a scenario where a test you were writing changed the state of the system or user in a way where other tests would fail? This solution may help you. While I am a big fan of running my tests at the same time in parallel there times where this may not be feasible. This is typically when you have a state that needs to be consistent.
Scenario
We'll use the repo linked below and use the account.spec.ts to demonstrate the functionality.
The code we will run is listed below. Notice the below there are 3 tests.
- In the first test we don't make any changes to any data we only make assertions.
- In the second test we make a change to the first name, last name, and street 1 address.
- In the third test we don't make any changes to any data only make an assertion.
The problem here is that the 2nd test changes data that test 1 and test 3 rely on "Jane Doe" first and last name.
//tests/account/account.spec.ts

import { test, expect } from "@playwright/test";

test.describe("Customer 01 my account specs", () => {
  test.use({ storageState: ".auth/customer01.json" });

  test.afterEach(async ({ page }) => {
    await page.goto("/account/profile");
    await page.waitForLoadState("networkidle");
    await page.getByTestId("first-name").fill("Jane");
    await page.getByTestId("last-name").fill("Doe");
    await page.getByTestId("address").fill("101 Testing Way");
    await page.getByTestId("update-profile-submit").click();
    await expect(
      page.getByRole("alert").filter({ hasText: "successfully" })
    ).toBeVisible();
  });

  test("validate customer 01 my account page", async ({ page }) => {
    await page.goto("/account");

    expect(await page.getByTestId("nav-menu").innerText()).toContain(
      "Jane Doe"
    );
    expect(await page.getByTestId("page-title").innerText()).toContain(
      "My account"
    );
    expect(await page.getByTestId("nav-favorites").innerText()).toContain(
      "Favorites"
    );
  });

  test("update customer 01 account", async ({ page }) => {
    await page.goto("account/profile");

    await page.waitForLoadState("networkidle");
    await page.getByTestId("first-name").fill("Testy");
    await page.getByTestId("last-name").fill("McTesterface");
    await page.getByTestId("address").fill("101 Testing Way");

    await page.getByTestId("update-profile-submit").click();
    await expect(
      page.getByRole("alert").filter({ hasText: "successfully" })
    ).toBeVisible();

    // Assert the updated name is displayed in the nav menu
    await page.reload();
    expect(await page.getByTestId("nav-menu").innerText()).toContain(
      "Testy McTesterface"
    );

    await expect(page.getByTestId("first-name")).toHaveValue("Testy");
    await expect(page.getByTestId("last-name")).toHaveValue("McTesterface");
    await expect(page.getByTestId("address")).toHaveValue("101 Testing Way");
  });

  test("validate customer 01 account other", async ({ page }) => {
    await page.goto("/account");

    expect(await page.getByTestId("nav-menu").innerText()).toContain(
      "Jane Doe"
    );
  });
});
Running the tests without options
npx playwright test tests/account/account.spec.ts
When running my tests with my default playwright.config.ts, the test ran with 3 workers 1 test for each, and all tests ran at the same time.
When running the tests you can see that the first test failed, and the 2nd test passed. This is because the afterEach block will actually reset the data for every test. I could make this where it only runs the afterEach based on the title see A Better Way to Control Before and After Blocks with Test Titles article.

Now I could go to my playwright.config.ts file and update the amount of workers that should run and set to 1, or change fullyParallel option to false but this would increase the full time of all of my tests running.
The good news is there is another option, to limit the way our tests run from within a test.describe() block.
Running the tests with "default" configuration option
To configure this add the line test.describe.configure({ mode: "default" }); within your describe block. The docs for this walk through the different options.
//tests/account/account.spec.ts

import { test, expect } from "@playwright/test";

test.describe("Customer 01 my account specs", () => {

  test.describe.configure({ mode: "default" });
...
This default option will allow tests to run one at a time in order within the describe block of a spec file. This allows you to override the default configuration for the rest of your test suite for a specific set of tests.

With this in place your tests are all passing again, and I still get the benefit of having the rest of my automation suite running in parallel.
There is another option for achieving the same result it is setting the test.describe.configure({ mode: "serial" }); The difference with using serial is if any of the tests fail while running in serial mode, the following tests that are apart of the describe block will be skipped. This could be useful if you have tests that build data for other tests, but that is a practice I would not recommend. Each test should create and cleanup it's own test data.


